


| Prior to stretching the
frame, you will need to loosen or remove the radiator hoses, unhook the
shifting cables, fuel line, brake line and the wires that are attached to
the firewall that do not have sufficient length to be moved back 11
inches. If you have not removed the battery, you will need to do so at
this point. The cut will actually go through the current location of the
battery. |
Preparation for cutting
It is very important
that you have a level surface to work on for this next step. Place the car
on blocks and use shims to level the car across the front as well as along
the door frames. Be sure to support the front half of the car in such a
manner that when you finish the cuts that the front will still be
supported. Use masking tape or duct tape to mark the frame 5 inches back
from the firewall where you plan to cut. This works better than trying to
draw a scribed line on the frame.
You will cut the cradle at a
location 1.5 inches back from the point where it attaches to the section
next to the firewall.
Once the car is fully supported, place a
floor jack under the back half of the car beneath the support that runs
under the engine. Cut through the first two frame pieces on each
side. Then cut through the cradle section. Once the car is
sectioned move the back half away using the floor jack. Insert the 11 inch
spacers starting on the top rail.
Tack weld the extension
brackets in place. Continue to check the level both across the car as well
lengthwise.

Check for square by using diagonal measurements. A good
measurement is from the edge of the rear strut support to where the
firewall meets the frame.
Measuring to check for square
When you are done welding the 2” square tube, you will then weld the
flat bar on the opposite side to provide additional structural support.


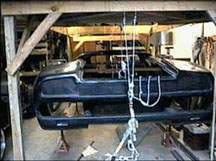
| I have had multiple questions about the rack that was built
to lift the car. It consists of 2 - 2x8x16ft for the top rail. These
were fastened to 4x4x7'6" posts with casters on the bottom. I used 2x8x7ft
across the front and back on the top and bottom. I used 2x4 angle braces
from the post to the 2x8s. I placed a 2x8 above the wheel wells over both
the front and the rear wheels. I installed pulleys in the 2x8s over the
wheel wells. I used a come along attached to the ropes that allow me to
lift the front and back together or separately. You do need to make
sure that your garage has the clearance to move past the garage door
opener as well as allow the doors to close. I have about 1/2" clearance
from the opener and about 2" from the door. It's tight but I can do it
without any assistance. |


|
| In order for the firewall to match up to the rear window on
the roadster, it is necessary to move the firewall forward 3". This
is accomplished by cutting on either side next to the frame and simply
puling the firewall forward. This is not necessary on the VT or SE.
To anchor the firewall I used 1x2 tube that I welded on top of the frame.
I then welded a small section perpendicular to the firewall and welded
this to a piece fastened to the top of the firewall. Because the firewall
metal is very thin and I welded flanges on either side of the 1x2 to
straddle the firewall for additional support. |


|
The front hinges will rest on a bracket that is fabricated from 1x3
inch tube with a piece of 3/8 inch flat bar welded to the top. This
piece is challenging to get welded in place. It is attached directly to
the frame. The section on the other side next to the brake cylinder is
really challenging as there is little room. (You will notice that there
are no close-ups of these welds)

| There have been some questions on the
possibility of removing the gas tank with the subframe installed. I need
to remove the tank to install a high capacity fuel pump. I made this
discovery after I had already welded the subframe inplace. By
cutting a section from the subframe and removing the sheetmetal directly
in back of the tank, it is possible to remove the brackets and pull the
tank out. I welded plates on either side of the section that I removed and
then drilled through the plates and subframe. I will bolt this piece back
in place when I replace the gas tank. |
There have been some questions on the possibility of removing the gas
tank with the subframe installed. I need to remove the tank to install a
high capacity fuel pump. I made this discovery after I had already welded
the subframe inplace. By cutting a section from the subframe and
removing the sheetmetal directly in back of the tank, it is possible to
remove the brackets and pull the tank out. I welded plates on either side
of the section that I removed and then drilled through the plates and
subframe. I will bolt this piece back in place when I replace the gas
tank


I got the linkage connected. It involved threading the ends of the
Northstar cable and the Fiero cable. I used the rods supplied by IFG to
tie the two together. I can now shift gears from inside the car..
Cool......

I added the diagonal braces from the stretch to the bottom of the
door. I used 2" tube. This should provide an extra bit of rigidity to the
car.


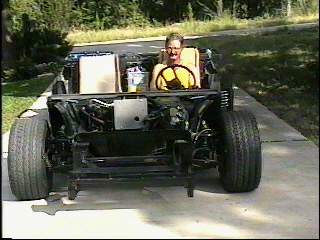
I can now drive my
car!I was able to get brakes hooked up and with the
adapters, I could mount my wheels. This is the way my Friday went just to
give you an idea what kit car builders go through. I had the 6000
spindles, but was missing two bolts and one axle nut (dealer items). I
went to the dealer and was able to pick them up. They had to be ordered
last week. I returned the Alante Rotors because they were vented and would
not go with the 88 Buick Riviera calipers. I got Pontiac 6000 STE (four
wheel disk version) rotors that would fit the Alante Hubs. I took back the
Riviera rotors and went with the Pontiac 6000 STE calipers because they
would accommodate the Fiero brake cable. Got the rotors installed and went
to figure out how to mount the calipers and found out the guide pins were
wrong size. It looked like I would have to fabricate a bracket. (I'm
getting good at fabricating things by now) Went to wrecking yard to see if
they had any brackets that could be adapted to fit. Two wrecking yards
later, I decided to go the the dealer. He was out of stock. Decided to try
O'Riley's auto parts. They had guide pins but they wouldn't fit my
calipers. I went to Van's Auto parts where I bought the 6000 STE calipers
and they told me that the calipers that I had in hand were for a 4 wheel
drive Pontiac. The guide pins were correct, the calipers were wrong. The
main store down town had the correct calipers and they were open till
8:00. I took the 4 wheel drive versions back and got two Pontiac 6000 STE
rear calipers and headed home. They bolted directly to the 6000 spindles.
Guide pins were included with the calipers. I went to supper and on the
way back decided that I should replace my rear hoses with new ones.
O'Rileys was still open and were out of stock but the other store had two
and could have them by 9:30 Saturday morning. Done deal. Went home
dreaming of driving my car on Saturday. Saturday morning up early, removed
old hoses, Bolted on last caliper about time Frank arrived. I needed to
move two of the boot clamps on the Northstar axle out a little as the boot
was pinching because the shaft had been shortened. Frank did that while I
removed the emergency brake mechanism from the 84 calipers. Oh, by the
way. The Pontiac 6000 STE calipers are exactly the same as on an 84 Fiero
caliper. This was good because I could now get back my $110 core charge.
By now its 9:30, call O'Rileys, hoses aren't in, should be in by 12:30.
Meantime, I can't get emergency brake brackets our because the star bolts
won't break loose. Drill them out, get the brackets but now I need some
bolts to hold the emergency brake bracket to the caliper. Frank and I head
to Van's to see if they have bolts and get another star socket and brake
bleeding kit and turn in the Fiero cores to get my $110. No bolts at Vans,
head to O'Rileys. Hoses are in, no bolts. Stop at ACE hardware and they
have bolts that will work. Progress. Head home, hook up hoses, Frank
attaches hose to first caliper and the calipers threads are stripped and
won't hold the hose bolt. Pull the caliper, head back to Vans to see if I
can get my 84 core back so I can at least hook up the brakes. They still
have my core, they order new caliper from other store which will be in on
Monday. Head back home, Frank has got the other brake line connected to
caliper, hook up old 84 Fiero caliper and new hose. Bleed brakes. Throw in
old seat. Start car, back out of driveway. Test brakes. Frank gets in and
we head down the street. I guess now is the time to see what this
Northstar will do so I punch it a little. WOW. So now I decide to really
hit it. MY GOD! This is probably more car than I have ever driven. It will
set you back in your seat and get your adrenaline going. Sunday I put in
one of the leather seats for a trial fit.


I added a brace in front of the rear radiators. I will tie in the
radiator frame with a strap ( yet to be installed) as indicated where the
yellow lines are

I started fabricating the plate to hold the shock bracket. The first
picture is the plate welded to the angle iron. The second picture is the
plate positioned inside the wheel well. I have not drilled the holes yet
for the shock bracket. The third picture is the bracket clamped to the
side of the dash where it will be welded. These pictures are on the
passenger side.


Here are the openings and the bolt holes that have been drilled. You
can see where the coating was removed inside the bezel to epoxy the bolts
in. I sprayed the outside with primer and will paint them a candy apple
red with clear coat when I am done.


I attached 1" square tube to the inside of the car that will be used
to attach the edge of the car to the rail along the bottom of the car. I
did not cover the rod in all places as I will be welding pieces to it when
attaching it to the car.


I attached a 1" square tube from the center to the side wall to give
the edge more rigidity. I notched the frame to accommodate the 300ZX
headlights. I filled in the area with plate steel. I built a frame to
support the front of the spare tire area that will also act as an anchor
for the straps that cover the radiator.


I filled in the original round opening that I had cut for the gas tank
and created the new opening in a better position to accept the filler
component off of the Fiero. This week I glassed the inside with mat. I
used epoxy to attach the fiberglass cutout to the Fiero gas cap.


Because my roadster was one of the first ones built, IFG has made
several improvements in the later models. The new roof section has a arc
that matches the inside of the roof panel and a slight backward
slope. Ray sent me the new section and I cut it in and added a new
steel section which I will glass in. I left the steel under the old
section until the new piece was glassed in and then I cut out the old bar
and replaced it with a 1" tube that I bent to match the roof line.


I got the gas cap door working. I still need to finish the inside
area. The area to the left of the cap is where I had cut the opening in
the wrong place the first time.


I made a 1" square tube frame to go along the bottom of the front
bumper. I will attempt to tie this into the frame once the car is finally
mounted.


I painted the trunk area and removed all the water pipes and painted
them blue to match the motor area.


I took a few shots as a refresher now that the body prep is nearing
completion.


I got a rod kit from Jegs and made a strut brace for the rear
struts.

I made necessary changes to the door to fit my modifications of
narrowing the door. I test fitted the weatherstripping to make sure I got
a good fit. I then installed the rocker pannels by pop riviting them in at
the bas and then glassing the top edge to the inside door lip.


Beginning the sanding process. I used masking tape along the body line
and sanded with 80 grit sandpaper to the edge of the tape, moved the tape
to the sanded line and then sanded the other body panel. This will help
define the line when painted. My wife Cheryl is helping out with the
sanding and keeping me going. I can't tell you how important it is to have
a partner who is supportive of your project. I am very lucky.


 |
Installed the motorized antenna. It automatically retracts when power
is turned off. If will not interfere with the roof pannel and it just
seamed like a good place to put it.


 |
Built a bracket to cover the wiring and hoses next to the firewall. I
actually installed one more brace not shown where it angles down. I then
cut sheet metal to fit around the wires and hoses and painted to match the
rest of the interior panels.


| | | | | | | | | | | | | | | | | | | | | |
| |