|
I revised
the seat frames for the third time to get the seats lower. I
started with the angle iron bolted to the existing seat rails. I
then took two pieces of angle iron that fit inside the seat
rails and connected by a piece of flat bar. I call this the "H"
assembly. The seat was then positioned and I measured the pieces
that I would need to connect to the flat bar fastened to the
front of the seat. Once this was fastened to the "H" assembly,
the rear plate was fastened to the seat and measurements made to
fix the angle. Not that the rear flat bar that attaches to the
seat has to be notched to slide over the bolts in the seat. Once
fixed, the seat was placed in the car in the desired position.
Holes were drilled through the H assembly and the seat brackets
for permanent mounting. The two assemblies are then bolted in
place.
|
|
I made a shifter
boot by cutting a ring out of ABS and then drilling holes
through the carbon fiber to hold it in place with screws. I made
a pattern for the boot, sewed it together, leaving an opening
for the shift rod, and then glued the bottom to the ring. The
ring was then fastened to the carbon fiber for a completed boot. |
|
Double-click to add photos |
|
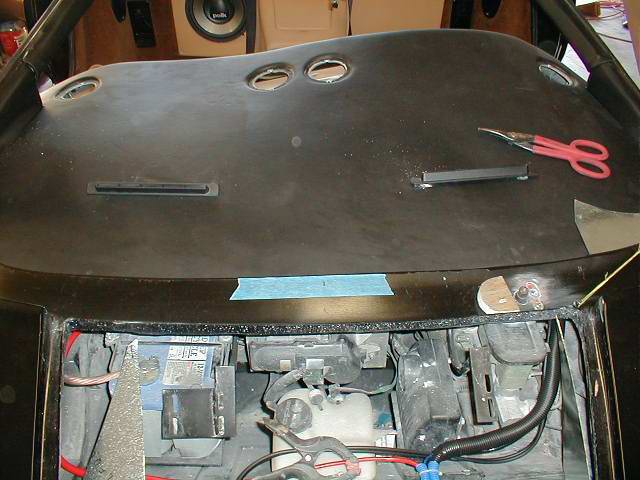
I installed the
front dash vents. These will not actually be hooked up to
anything but they will give it a more authentic look. |
|
|
|
|
|
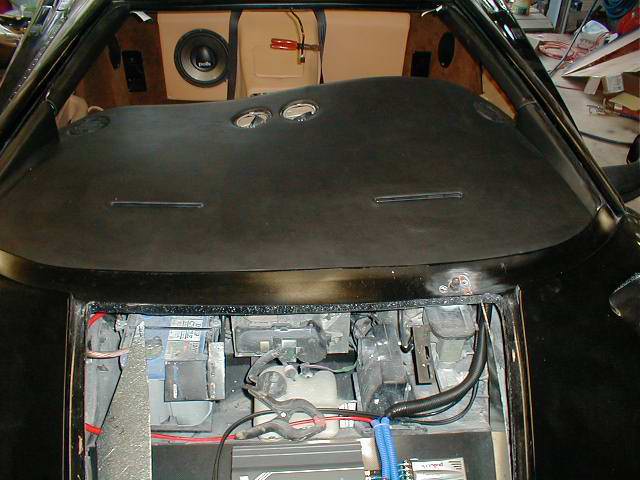
After the peddles,
I moved on to fabricating the housing to cover the roof support
and then install the tweeters. This involved cutting our a
straight section of the top cover of the dash, shaping a metal
piece that was pop riveted to the window post. This was then
covered with foam and then upholstered. The tweeters were
installed and wired in. The Dash piece was actually fastened to
the front frame with 1/4" self tapping screws.
|
|
|
|
First the radio
and heater controls. I used a hex headed cap screw to hold on
the carbon fiber panels. I made brackets from channel to fasten
the radio box and heater controls. I bondoed them into the dash
area and then installed the radio and heater controls. I also
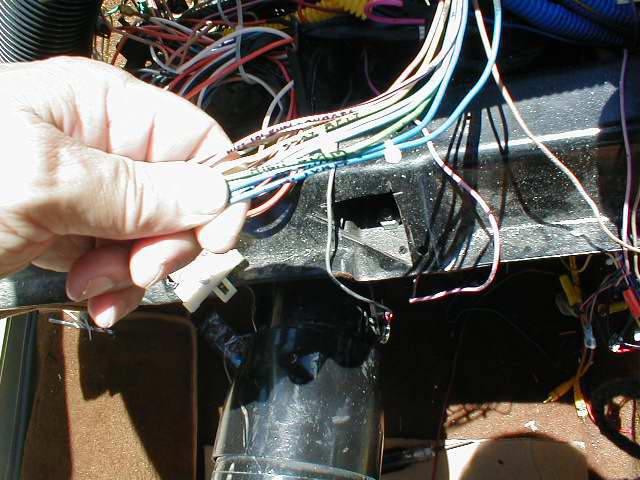
mounted the alarm blinking light above the radio. I also found
out that you can use a fine pointed Sharpy pen and write on the
wires to label them |
|
|
|
Next I did the peddles
|
I reworked
the amp to move the fuse closer to the battery and rerouted the
connections to clean it up a little. I also made cardboard
templates for the top and sides I routed the rear speaker wires, antenna
wires through a flexible tube and fastened to wheel well. I used padded
clips to fasten the wire loom with mirror controls, speaker wires, window
controls and door solenoids to the front. I placed the Alpine AMP where it
would be fastened to the trunk braces. I installed the metal cover over the
braces and then used an ABS sheet that I had bought that has a carbon fiber
imprint. I mounted Amp and crossovers and ran wires to interior for
connection to the steareo. I routed the rear speaker wires, antenna
wires through a flexible tube and fastened to wheel well. I used padded
clips to fasten the wire loom with mirror controls, speaker wires, window
controls and door solenoids to the front. I placed the Alpine AMP where it
would be fastened to the trunk braces. I installed the metal cover over the
braces and then used an ABS sheet that I had bought that has a carbon fiber
imprint. I mounted Amp and crossovers and ran wires to interior for
connection to the steareo. |
|
|
|
Last tidbit. When I was visiting IFG when I went to Knotts, I
watched Todd work on making upholstery. He used lighter fluid to
clean off the glue residue and then followed that up with a
leather cleaner. Works great.

After getting back from Knotts Berry Farms
and talking with several builders, I redid the heater hoses. First of all
most builders are only using the center two defrosters. I bought the heater
elbows from Ken at North American. He recommended that I use shop vac hose.
I found a kit that included six fittings and 10 feet of hose. By cutting the
fittings, they slid over the elbows and will attach to the hose. I replaced
my hand made chimeys with 1.25" electrical conduit fittings that have the
nut on the back side. This allowed me to put in a fitting for each vent that
I was going to connect. After installing the conduit and nuts, I
ground off the excess to make it fit within the heater box without hitting
the heater flaps. Turned out much better. |
|
|
|
As I explained, once I got back, I pulled it
all apart to start on the wiring again. After all the discussions on the
switches, I opted for something simple. I am using the Fiero Mirror and
window controls simply cut into the carbon fiber piece. I had to attach some
metal pieces to the bottom to fasten the controls to. For the lights,
parking lights and fog lights, I picked up the 3 switches from O'Riley's
that have indicator lights and pre-made labels that met my needs. It may not
be authentic but it looks clean and professional. |
|
|
|
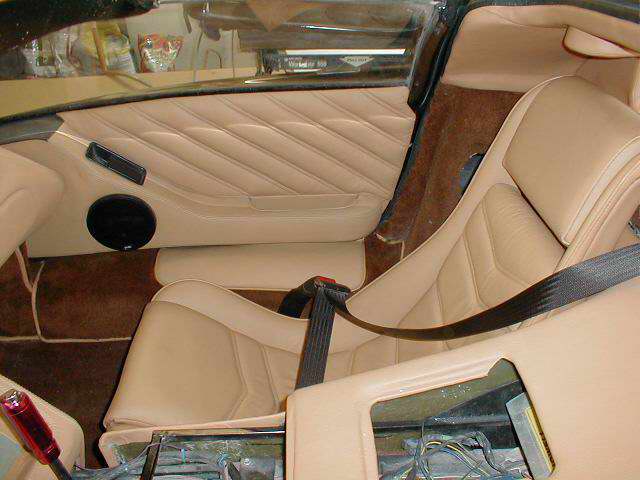
Every once in a while I have to put it
together to see what I am shooting for. The seats are not on rails, the
instruments are not connected and I don't have the windshield in. It was
time to take it out, clean it up and admire the work so far. After I get
back from Knotts, It will all come apart again and I will pick up where I
left off. |
Dash as it will eventually be.
No guages are hooked up but it looks really good The dash conceles all of the wiring and ducting mess that is best left covered

Dash as it will eventually be.
No guages are hooked up but it looks really good
|
|
Finished connecting the ductwork to the
heater box. It is very crowded under the dash |
|
|
|
Relocated the shifter back and raised the
position of the shifter. Because my Northstar is an Automatic, I will simply
use the center slot on the shift gate. I will need to actually make the slot
a little longer to cover the shift pattern. |
|
|
|
I began work on the heater box. Using a piece
of Plexiglas, I could see where the openings would need to be located. By
drilling out 3" holes and using sheet metal I made 3 chimneys to fasten the
ducting to. |
|
|
|
I needed to come up with a way to fasten the
top of the dash to the main dash section. I created 4 bolts that were welded
to a plate, bondoed and glassed to the top. Because of the angle of the
bolts, it was necessary to make slots in the main dash to accept the the
bolts. I can use flat washers and nuts on the inside to now hold it in
place. |
|
|
|
Received the carbon fiber dash insert from
IFG. If you hold it up to the light, you can see through the weave. After
sanding with 2000 grit and using rubbing compound and glazing compound, I
used flat black on the backside to fill in any clear areas. The finish is
fantastic. I used my Plexiglas template to locate the gauges. This worked
out well as the hole saw could not skip and mar the finish. |
|
|
|
Received a new piece or leather from IFG to
do the final cover on the console door. I was concerned about how to open
the door and I decided to make a small indent in the console so I could lift
the door instead of putting a handle or latch on the door. I am using a
magnetic door latch to keep it closed. It doesn't open very wide and a
friend suggested I use a hinge similar to the front trunk so it would clear
easier. This is after I had everything in and his suggestion is a good one
so I will probably remove the subwoofer and remove the console and put in
different hinges |
|
|
|
I've been trying to figure out the inside
dome lights. I have a GMC Sonoma truck that has dome lights in the bottom of
the mirror. So I started looking for passenger cars that has a similar
layout. A Chevy Lumina has the lights in the mirrors. They can be both dome
lights as well as reading lights. I had to run a the three wires
through the roof section to where the mirror will be located. |
|
|
|
Completed the top release mechanism. I used
the original Fiero door handles and modified them to accept two cables. One
for the roof release over the rear window and one for the roof release on
the motor deck lid. One on each side of the car will release that sides
roof. |
|
|
|
Picked up an Alpine
amplifier for the Stereo system. |
|
 |
|
Spent three days on the center console. Re
did it four times and still not finished. Good lesson in trial and error. |
|
|
|
More work on the carpeting. Finished the
drivers side. Had to build a bracket to hold the front trunk release before
I could finish the carpet. Once the bracket was fabricated and bolted to the
side, I used FRB board to cover the end cap. This was then covered with
headliner foam, then covered with carper. The interior pieces were added and
finished out. |
|
|
|
Worked on putting in the carpet. First I cut
the padding provided by IFG to size and then used it as a template for the
other side. The padding is fastened using spray adhesive to the floor and
then the back of the padding. Before putting the padding down, I located the
positions for the seat belts and drilled the holes. After the carpet was
installed, I used an awl from underneath to locate the holes and then cut
out the carpet to allow the seat belt holes to receive the bolts. After the
bolts were put in place, I under coated the car. |
|
|
|
This section shows how the back area is glued
to the FRB template with the padding. The actual piece that fits around the
roof receivers has tabs mounted so that it will fit above the window
section. The tab in the opening is to hold up the padded cap that is built
in the section below |
|
|
|
This is how you use a standard tin can and
end up with an upholstered cap to cover the roof reciver |
|
|
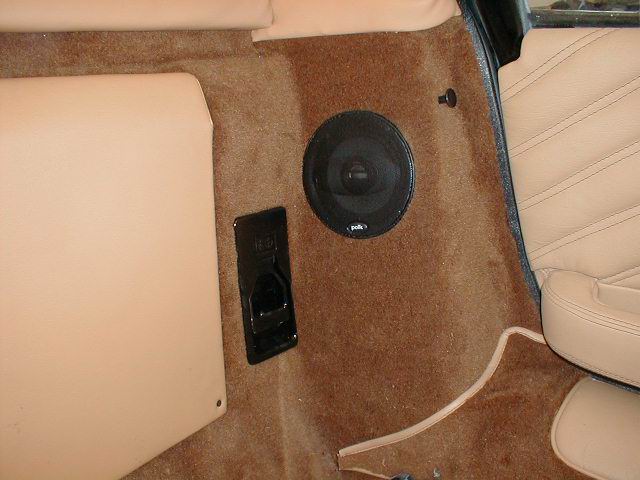
| Trial fit of the center
consol with the sub woofer |
Opening cut in side for speakers Window and divider piece as well as sides have been upholstered in black. After seing it finished, I will be redoing it in tan to match the seats. Just one of the many trial and error steps that we go through Seat covers up the subwoofer

|
|
How to build a sub woofer in a
tight space |
|
|
|
This shows where I had originally covered the
side with vinyl. I am redoing it with carpet on the lower
section and vinyl on the top section. This also shows the new
center consol and the area that will be filled with carpet. I
decided to use the Fiero handles to release the top latch on the
roof and the motor deck lid from inside the car. So I needed to
make an area to accommodate the modified Fiero handle. I
started by putting a lip on a piece of angle iron that would
support the back of the new console. Next I created a wood frame
that matched the outline of the console and allowed me to have
space for the handle. I used screws and liquid nails to fasten
the framework to the firewall. Next I used
3/4" aluminum angle iron and shaped it to match the rear
console. I pop riveted it to the FRB board on the wall. I
drilled two holes to accommodate the bicycle cables that will
release the roof from both the top and the deck lid. In other
words, the right handle release both receivers on the right side
(top and deck lid). Next I used insulated padding that was
backed with foil to prevent heat build up in the interior. I
covered the sides with the IFG supplied carpet padding. I cut
out the area around the speaker to allow the carpet to be
recessed so the speaker cover will fit in a recessed fashion.
I then installed the temporary Fiero handle. I will hook up
cables later. |
|
|
| I needed to
notch the top piece to fit around the extra support that I added to the
windshield. Once this was done I could then mark the lower piece of the dash
to clear it as well |
|
   |
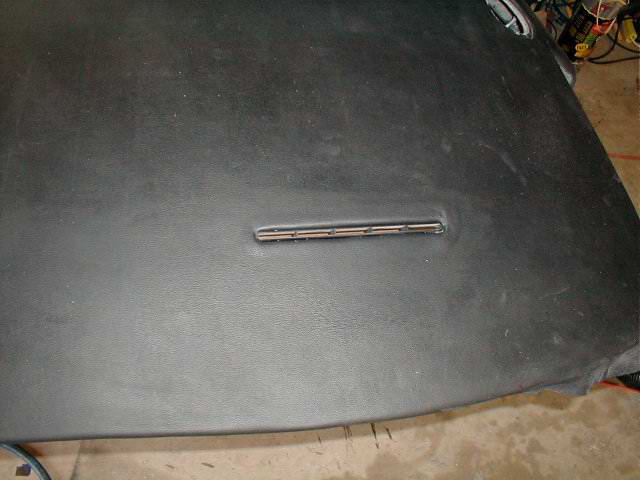
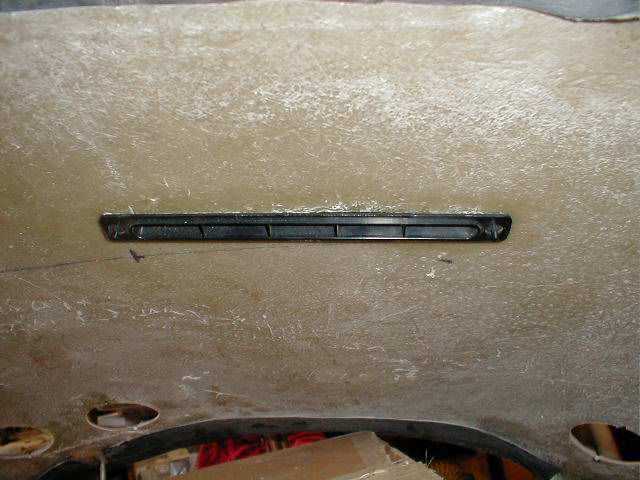
| The top piece has 4
defroster vents. I marked the top and cut small holes in the
center to make sure that I didn't damage the leather when drilling
through. I drilled a pilot hole from the front and then cut
a 3" opening from the back just barely going through the
fiberglass into the padding. From the front, I cut out the leather
and loosened it from the foam. I cut out the foam about 1/2"
in from the circle so the leather could be glued down and allow
the vent to sit into the padding. Repeat the process 3 more
time and you have a completed top piece.
|
|
      |
| I bought Autolock's alarm system and will be studying on the
connections that I need to make. I should be able to open all doors, deck
lid, trunk as well as disable the start feature with this unit.
|

|
| Began working on the interior finish out. Started. There are some
great interior pictures from another lambo build site at
http://home.pacbell.net/oohec/ As you can see the real Lamborghinis have a
bar directly below the window. I decided to use a 3/4" x 2" piece that I
bolted to the firewall. I put spacers on the back to give me some room for
the padding to go under as well as clear the computer
assembly.
|
 

|
| I mounted brackets on the backside of the firewall by pop riveting
them in place. I cut a piece of FRB board to size and then drilled through
the panel and the bracket. I used a panel anchor installed through the FRB
board before I covered it with 1/2" foam.
|


|
| I began gluing 1/2" foam that will go beneath the side covering. I
will remove the foam inside the red circle so that the speaker cover will
be recessed. It is import that when you are using spray adhesive that you
cover your paint job so it does not end up with glue all over it. I
also need to get a sewing machine do do some minor modifications to
accommodate my panel design. I have spent time at the fabric store to get
foam, marine vinyl, buttons etc. A humbling experience but we have to do
what we need to to finish these things. I have started putting on
the coverings but am not satisfied enough to post any pictures. Maybe in a
week or two.
|


|
| I primed and painted the seat tracks and mounted the seats. I may have
to lower the tracks as the seats are a lot higher with the padding than
the old fiberglass shells. I believe I can drop them 1/2" to 3/4" and
still use the track. If that is not enough, I may have to eliminate the
tracks and go with fixed seats.
|


|
| Before installing the interior panels. I needed to cut out a portion
of the sheet metal to make room for the rear speaker. Next I cut a
template from cardboard and then cut the interior panel from FRB board. I
marked the location of the speaker. I then pop riveted the panel in place.
Next I glassed in the panel with mat and resin.
|


|
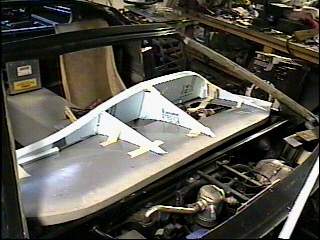
| I got out the interior pieces and layed them all out so I could start
planning the next stage. I am getting the new style dash and center
console from IFG. These are all the pieces that will neede to be
installed. (seats not shown but I have the leather seats from IFG)
|


|
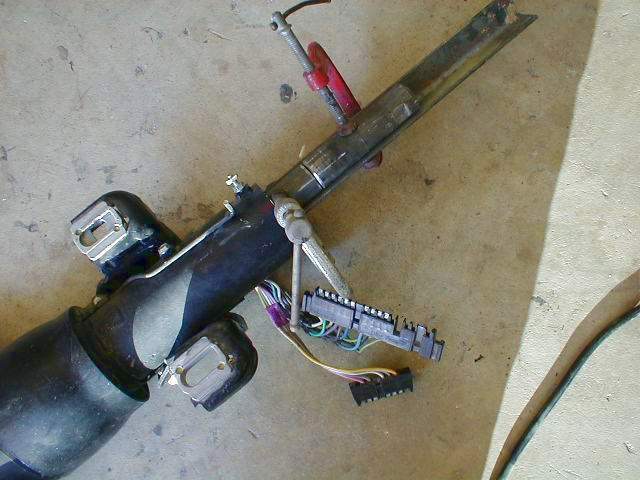
| I needed to shorten the steering column by 3.5" so that it would fit
better against the dash as well as give a little more room in the car.
First I picked a fixed point on the car and measured the distance to the
steering wheel color. In this case my point was 16.5".
|
 
|
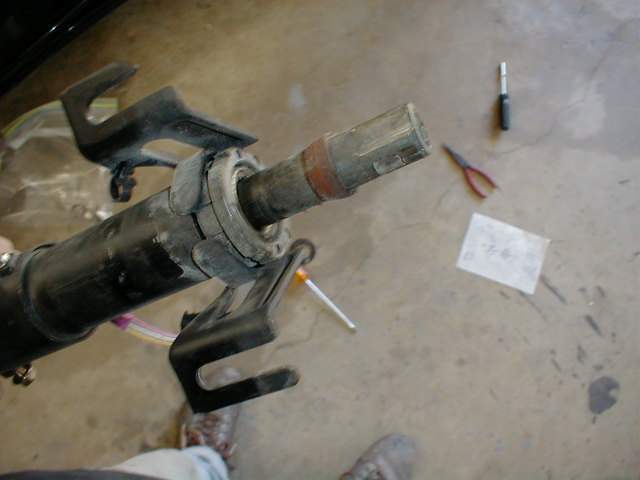
| After disconnecting the wiring harness, the brackets and loosen the
clamp at the flex joint. Remove the column. You will need to remove the
spring and rubber seal from the shaft. Notice the small wedge that will
have to be replaced. Tap out the bearing which will open up the column.
Next tap out the inner column. You will notice there is an internal column
that wedges the two pieces together.
|

|
| Next cut off the bracket that had held in the steering brackets. I cut
two opening in the existing framework so I could drill and put nuts on the
bolts that will be holding the front brackets.
|
 
|
| Once the column was separated, cut 3.5" of the inner tube.
|

|
| Before cutting the steering column rod itself, be sure and
scribe a line on the tube that will allow you to align the pieces up after
you have cut out the 3.5". Be sure and that you bevel the ends of the tube
into a "V" groove so that you will get good penetration on the weld. This
weld needs to be good enough for your life to depend on it. I used a
piece of angle iron to clamp the pieces of the rod to and then spot welded
them together. Once I had verified the alignment was still good, I then
final welded it.
|
|
| I ground the weld on the rod smooth and took this opportunity to paint
the column.
|

|
| Insert the inner column and reassemble in the reverse order. The
column is now 13" from my original measurement point.
|

|
| Cleaned out and primered the passenger side. Used steel brush, then
painted with gloss black. Drivers side and rest of interior yet to be
completed.
|
  
|
| I got two new Bull Emblems that I will be using on the sides. I use
the same technique of cutting out the shape, bondo on the back, Glass over
the top. Because This will be very obvious, It has taken a lot of work to
get it recessed just enough that it will have the very finished
look.
|
 
|
| On with the learning process. I got an email from a gentleman that had
made molds before. He said that he used spandex stretched very tight and
then apply resin directly to the spandex to create a shell. Then he came
back with mat and reinforced it. The process would work but I talked to
Ray Saturday and they are making the 2000 dash. I will get one from Ray
instead of working on this one. Some pointers. If you use the foam then
you may want to apply a lite coat of bondo to the foam. Reason, the resin
melts the foam. I could make this work but I would be better off moving
towards something more productive.
|
 
 
|
| The problem with trying something new is there is a lot of trial and
error. What you don't see is the pile of wood, etc that didn't make it to
the final go round. What I ended up using was a sheet of 3/4" builders
foam and epoxy to build the basic shape. I am going to use lath screen to
form the shape over the existing dash. When glassed in it may not have the
smoothest finish but It will be covered with foam and upholstery.
|
 
 
|
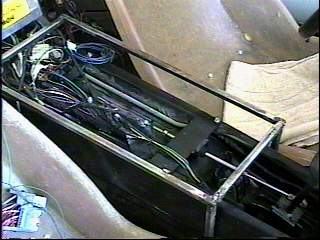
| I installed the framework to support the center console. It is made
out of 1/2" square tube that was welded to the Fiero console. I was sure
to not get it too hot as the gas tank is just on the other side of the
console.
|

|
  
|
| I started working on the seat brackets. I bolted the Fiero brackets to
the floor and them welded a piece of flat bar across each end to make a
frame. I took the measurements from the finished seats where the bolts are
set for mounting. I made plates to match the bolt locations and then
tested the angles and made metal supports to go from the frame to the
plates attached to the end of the seats. The seats are now adjustable
front to back. It would be possible to gain about 1/2 to 3/4 inch by
cutting off the Fiero mounting points and flattening them out.
|

|
| I remounted the emergency brake. I eliminated the bracket from IFG and
bolted it directly to the frame. It was necessary to remove the curve from
the handle and straighten it out. I spent last weekend connecting the
emergency brake cables and installing the last caliper. (I had to order
the left one because the brake fitting had been stripped). I had an
opportunity to lock the brakes when a squirrel decided to attempt suicide
during one of my test drives this weekend. They work really good and the
squirrel will have to find some one else to take him out.
|

|
| I started the framework that will hold the center console.
|
|